When I first started out bug hunting, I was decent at recon and had a sense for what targets I wanted to go after.
But once I got to exploring the target, I didn’t have a set methodology. I just wandered around on the site until something caught my eye in Burp.
Without a structured approach, I found myself not going very deep into the application and repeating testing efforts. This might be OK to do in terms of bug bounty, but won’t get you very far. And is certainly not something you should ever do in a pentest.
In this post, I’ll walk you through my approach and how I document results.
Steps
There’s nothing special or complex about my approach. It’s actually pretty simple so that it can be easily repeated across different targets and flexible.
The general steps are as follows:
- Fingerprint Server
- Expand attack surface
- Threat modeling
- Exploitation
Of course, I’ll walk through the specifics of what I do in more detail.
It’s worth mentioning that these steps don’t necessarily have to happen in order. For example, you may not know the database you’re working with until you trigger an error in the exploitation phase. So, don’t block yourself unnecessarily if you’re stuck on a step.
Part 1: Fingerprinting the Server
The first thing I want to find out about a web application is how it’s hosted. Mainly:
- Where is it hosted? Cloud service? Dedicated server?
- Does the program host own to infrastructure?
- Is the application sitting behind proxies? A WAF? A CDN?
- What type of server is it and what technologies does it use?
These are just some questions you can ask to get your gears turning. Feel free to go much deeper here. Get curious and be determined to understand the inner-workings of the application.
There are various techniques you can use to find this information. For example, you can use dig to query DNS information and see what the IP addresses the domain resolves to. You can use popular fingerprinting tools like Wappalyzer to see what technologies are in use. Sometimes the server will leak back-end information in response headers such as the Server and X-Powered-By headers.
Those are just some examples. I won’t dive into too much detail because tools and techniques are constantly evolving. As long as you know the methodology and mindset, you can use what works best for you.
Part 2: Expand Attack Surface
The goal of this step is to uncover as much functionality of the application that is available to us. The more functionality that is uncovered, the more potential there is for bugs.
There are two main steps to this process:
- Mapping the application
- Discovering hidden content
Mapping the app
Mapping the application involves finding all of the functionality and endpoints that are available to us. This can be as simple as browsing through the application and noting the major functionality and flows of the application.
When I manually explore an application, I aim to use every available action I can and understand how it fits. I take note of how authentication is handled, create multiple accounts, note any roles being used, upload files, fill out forms…you get the idea. Use the application like an involved user would.
As a note, you can proxy all of this traffic and analyze the requests, but I usually stay high level during this first manual pass.
To automate this process, you can use a web crawler to crawl the page and JS to get endpoints this way, but don’t use this as a replacement for manual exploration. The most important aspect of exploration is your understanding of the app. Which is best done manually.
Discovering content
Discovering hidden content will take you a step further. This is where you will brute-force directories, discover hidden inputs, and scan for virtual hosts. The goal here is to find content that is unintentionally exposed or out of reach from normal users.
Success at this phase will not only lead you to find less protected areas of the application, it will also set you a part from other hunters who may be testing the more directly available areas of the app. Thus, you increase your likelihood of finding bugs.
This step builds off of the previous part. If you took the time to really get to know how the application is structured and served, your fuzzing will be much more effective. For example, if I knew that this was an IIS server running Cold Fusion, I would use wordlists specifically tailored to that stack. I wouldn’t waste time using the general-purpose wordlists that can generate tens of thousands of requests.
This may not be a big deal in some cases. But if I know a WAF is present, I may want to limit my fuzzing.
Part 3: Threat modeling
The goal of this step is to prioritize what you want to test and identify potential threats that may apply to the specific context.
For each flow and functionality you identified:
- Assign a priority
- Identify threats
Priority
The priority is higher for areas that are more sensitive or draw more interest to you as an attacker. For example, authentication and sensitive user actions (like account deletion) may be a higher priority than say an a checkbox that subscribes a user to a newsletter.
You may want to spend more time and attention on higher priority items as any bugs found here would have more impact. To a bug hunter, more impact = higher reward.
Threats
The next step is to brainstorm what threats could cause potential bugs in the functionality you’re testing. These can be OWASP top 10 vulnerabilities or logic vulnerabilities specific to the context your testing in.
Don’t overlook this step as it will help maximize the effectiveness of your testing. For example, testing a for file upload vulnerabilities is very different than testing JWTs. You can also add elements of your own creativity to test for edge cases in business logic flows.
So, use your creativity to guide your testing to the next level!
Part 4: Exploitation
This is the final and most exciting step of the process. Here, you’ll be exploring each area in more depth and running through test cases.
Think of this step as more of an extension of the previous step than simply exploitation. You’ll be:
- Analyzing proxied traffic to get a deeper understanding of the process behind a flow/function
- Adding edge cases and threat-specific tests to your threat model
- Running through outlined tests
Here’s where you can really use your creativity to expand upon the threats you identified in the previous step. Digging deeper into the functionality and exploring the technical details will give you a better understanding. You can then use this deeper understanding to come up with more test cases.
Of course, if you’re unsure of what to throw at the application, you can leverage existing checklists for ideas. PayloadsAllTheThings is a fantastic resource for getting up to speed with basic web vulnerabilities. AppSecExplained also has some great checklists you can build off of.
As you grow as a bug hunter or web pentester, so too will this step.
Staying organized
Now that you have an idea on the basic process, it would help to know how to practically implement this. Luckily, I created a checklist that you can use as a platform to base your testing on.
I highly recommend using a checklist to organize your testing efforts. This keeps you from repeating any testing efforts and guides your progress. Even better than using a checklist is creating your own. Everyone tests differently and has their own style. So make one that best fits your own needs.
Besides a checklist, you’ll also want to keep notes. Everyone has their preferences when it comes to this, but I like to use a mind map in Xmind to keep track of my progress.
I like mind maps because it’s easier for me to organize and visualize the heavy amount of information that comes with hunting. Xmind is super useful because it allows you to attach notes to nodes and mark them with symbols for visualization. Here’s a peek at what mine would typically look like:
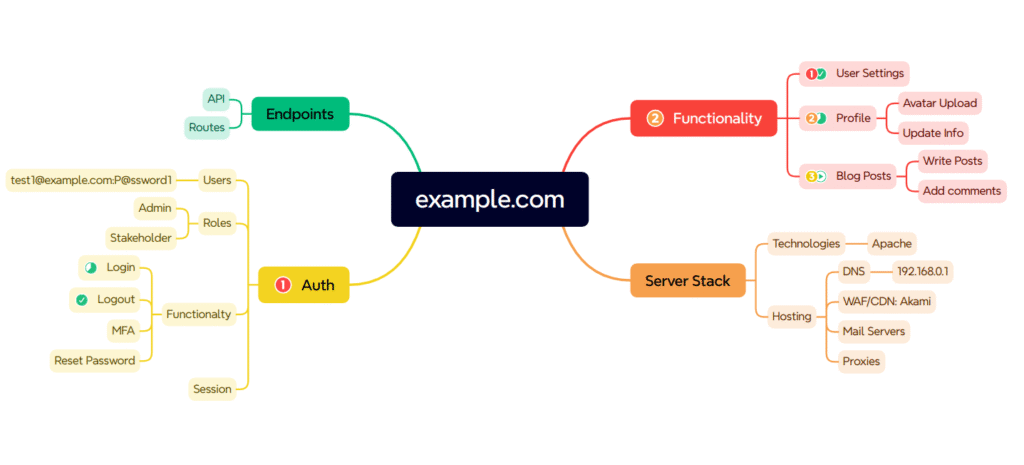
I love that you can use markers to prioritize areas to test and mark progress. And it’s free!
Conclusion
If you feel like you’re floating around the web app when you do your testing, you may need to refine your methodology.
I highly encourage that you create and regularly use a checklist when you conduct your tests. A checklist will help to ensure your testing is efficient and purpose-driven.
And when combined with the right note-taking tool to keep your testing well-documented, you’ll be unstoppable.
Methodologies and documentation might not be the most glamorous part of pentesting but being proficient in this is an invaluable skill.
Happy hunting and hoped you learned something!