Recently, I’ve been working on APIsec University’s API Penetration Testing Course, where I’ve learned some invaluable methods of API hacking. One of the coolest things I’ve learned is how to effectively map out an API. So, in this post, I’m going to pass on what I’ve learned to you.
Why waste time mapping an API?
To some, bothering to map out the routes of an API can seem like a waste of time. But I assure you, taking the extra time to discover and organize the hidden functionality of an application is well worth the extra effort—and with the method I’m going to teach you, it’ll be a snap!
Web apps are complex!
Today’s web content is rapidly becoming pretty advanced. It seems that the need for desktop applications is coming to an end as they are shifting to being hosted on the web. From email clients and note taking apps, to online IDE’s and video game streaming—anything can be done on the web!
To implement this complex functionality, web applications need an equally complex API. Examining these API’s can quickly get overwhelming. If you only rely on tools like Burpsuite or ZAP, you’ll quickly find yourself drowning in the amount of requests you’ll find. It can also be hard (at least in my experience) to organize these routes in a way that allows you to quickly go back and reexamine important discoveries.
This complexity is a turn-off for most. I mean who wants to spend time digging through a bunch of messy JSON!?
APIs are juicy!
Dealing with confusing API’s is worth it because they are a goldmine for bug hunters.
All of the functionality of a web application is handled through APIs. Handling user data, logins, storing your Google Docs—it’s all done with the magic of API’s! That’s why I seek them out and that’s why you should too.
Like I mentioned earlier, API’s are complicated and not super interesting upfront. Most people like to go after what they can see in front of them or what automated scanners can pick up. So, if you’re a bug bounty hunter, interacting with APIs that require authenticated access could be your ticket to some bugs. More often than not, these bugs are going to be critical as APIs often deal with sensitive data.
So, without further-a-do, let’s get you on the fast-track to exploring APIs!
My Methodology
Keep in mind that this is my way of doing things. What works for me may not be the best for you. So, feel free to follow my advice as loosely (or closely) as you want!
Having a click-around
The first thing I like to do whenever I approach an application is having a good old-fashioned click-around.
I click on links and buttons, fill out forms, make a user account, login—everything that a normal user is expected to do. All the while, I pay attention to what the overall functionality of the app is. I it a note taking app? A job board? An online store? etc…
While doing this, I keep my browser’s dev-tools open to see how the application is handling what I’m doing. The app can have a specific route for handling API requests, like /api/v2/, /user-api/, /content-manager/…you get the idea. It can even have separate domains for handling function calls, like api.example.com, example-api.com, the list goes on…
Knowing where requests are being made to is crucial in the next steps. We only want to target specific API’s, so we need to know how to filter the traffic we gather later on.
The point of all this is not to get to hacking the app. I actually do the opposite here by using it as intended. Knowing what the application normally does will help me to understand how I can exploit it into doing abnormal things later. Knowledge is power.
Of course, you can go as deep or as shallow into the application as you want. It depends on your workflow. But, don’t sleep on this step! It might save you tons of time backtracking in the future.
Click-around v2
This second click-around is where all the magic happens. Now, we’re going to proxy all of our traffic using mitmweb which is a part of the mitmproxy suite of tools. If you don’t have mitmproxy, I highly suggest installing it.
mitmweb --listen-host 192.168.186.93 --web-host 192.168.186.93
[13:51:03.580] HTTP(S) proxy listening at 192.168.186.93:8080.
[13:51:03.582] Web server listening at http://192.168.186.93:8081/
[13:51:03.851] No web browser found. Please open a browser and point it to http://192.168.186.93:8081/
I have mitmweb running on my Kali Linux virtual machine in VMware. By default, mitmweb will run the proxy and web interface on localhost. I like to set my host to the address of my virtual machine (192.168.186.93) so I can access it on my host machine. This is because I like to do everything that needs graphics on my host machine and just run Kali without a desktop so it is as low-impact on my laptop as possible. I find this makes my experience a bit smoother on my laptop.
Anyways…Now, that we got the proxy up and running in Kali, I pip open a web browser and proxy the traffic through it. I’m going to target Reddit. From my earlier click around, I know that their API handling login is routed under www.reddit.com/api, while actions such as upvotes seems to be handled by oauth.reddit.com/api Knowing that, I’m going to focus on the second route and click-around!
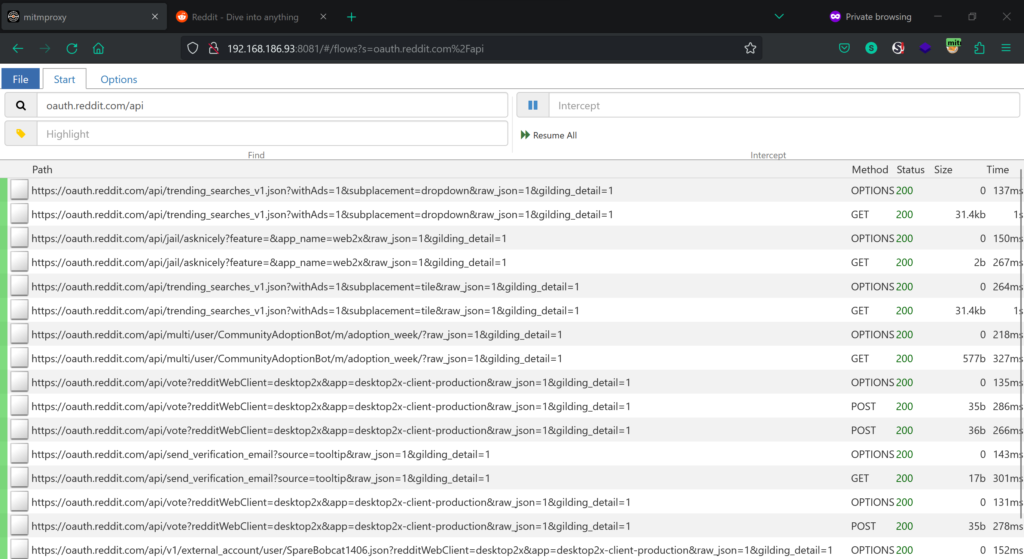
After some light clicking around, a ton of requests can be seen from the webui, which runs on port 8081 by default.
For my browser of choice: Firefox. I choose to use Firefox because I like it’s dev-tools and the FoxyProxy browser extension conveniently allows me to switch between proxies.
Let’s download the requests we want to examine in a flow file so I can examine them.
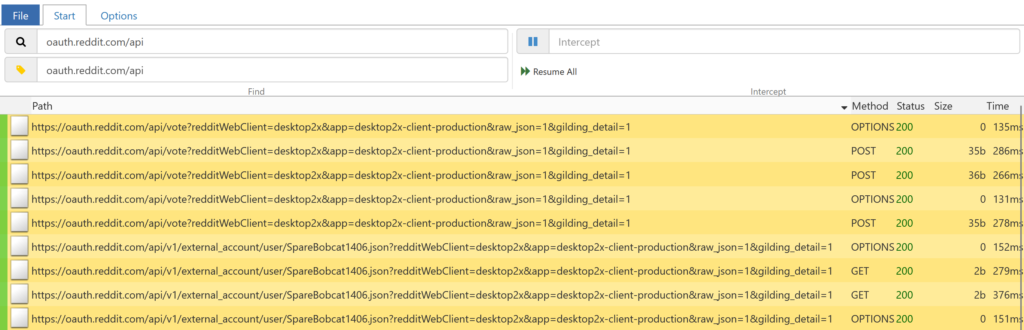
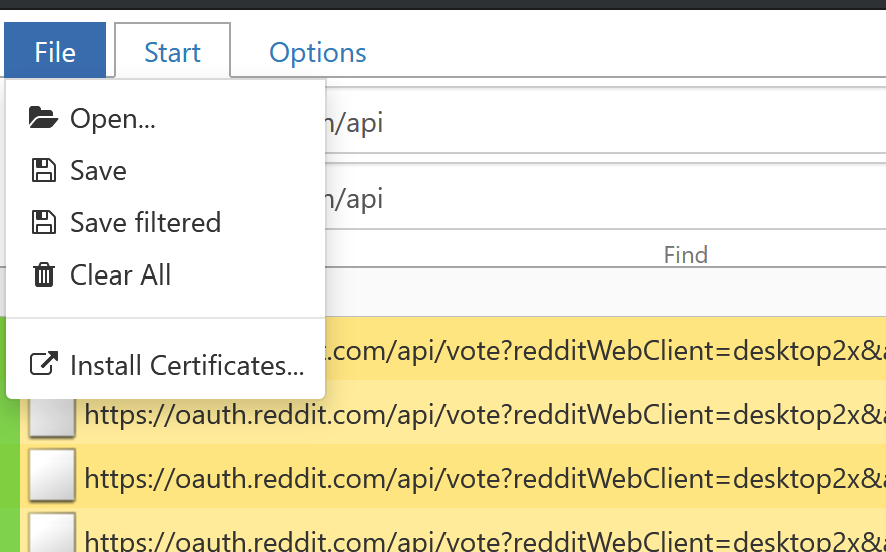
I like to use the highlight bar (the input under the search bar) to highlight only the routes I need. Then I click File and finally, Save filtered to grab only the relevant requests.
I find that saving only the necessary routes dramatically reduces the size of flow file. Without doing this, mitmproxy2swagger (the tool we’re going to use to process the flow file) might hang if the file is too big.
Converting the flow file
The next step is to convert this flow file into a YAML file that other tools can read. To do this, I’m using a tool called mitmproxy2swagger.
After copying the flow file over to my Kali machine, I run mitmproxy2swagger like so:
┌──(walter㉿kali)-[/tmp]
└─$ mitmproxy2swagger -i flows -o spec.yml -p "https://oauth.reddit.com" -f flow
No existing swagger file found. Creating new one.
[▌▌▌▌▌▌▌▌▌▌▌▌▌▌▌▌▌▌▌▌▌▌▌▌▌▌▌▌▌▌] 100.0%[warn] flow without response: http://192.168.186.93:8081/flows/dump?filter=oauth.reddit.com/api
Done!
Let’s break this down:
-ispecifies the input file (in this case ourflowsfile)-ois the output file. We want to name itspec.ymlso thatmitmproxy2swaggerrecognizes it on pass 2 (notice it said it didn’t find a swagger file)-pis the URL we want to parse-fis the format. In this case, it’s theflowformat butHARfiles are also accepted
We’re not done with mitmproxy2swagger just yet. First we need to edit our spec.yml file to tell it which routes to process. My spec.yml file looks like this:
openapi: 3.0.0
info:
  title: flows Mitmproxy2Swagger
  version: 1.0.0
servers:
- url: https://oauth.reddit.com
  description: The default server
paths: {}
x-path-templates:
# Remove the ignore: prefix to generate an endpoint with its URL
# Lines that are closer to the top take precedence, the matching is greedy
- ignore:/api/jail/asknicely
- ignore:/api/multi/user/CommunityAdoptionBot/m/adoption_week/
- ignore:/api/send_verification_email
- ignore:/api/submit
- ignore:/api/trending_searches_v1.json
- ignore:/api/v1/draft
- ignore:/api/v1/external_account/user/SpareBobcat1406.json
- ignore:/api/vote
Notice the comment that tells us to remove ignore tags before the route. All of those routes look interesting to me so I’ll go ahead and remove all of them:
openapi: 3.0.0
info:
  title: flows Mitmproxy2Swagger
  version: 1.0.0
servers:
- url: https://oauth.reddit.com
  description: The default server
paths: {}
x-path-templates:
# Remove the  prefix to generate an endpoint with its URL
# Lines that are closer to the top take precedence, the matching is greedy
- /api/jail/asknicely
- /api/multi/user/CommunityAdoptionBot/m/adoption_week/
- /api/send_verification_email
- /api/submit
- /api/trending_searches_v1.json
- /api/v1/draft
- /api/v1/external_account/user/SpareBobcat1406.json
- /api/vote
I edited the file in vim and used the command :%s/:ignore//g to quickly replace all instances of ignore: with an empty string. If that doesn’t make sense to you, maybe I’ll have to make a vim tutorial in the future…
With the ignores removed in the right places, I’ll run mitmproxy2swagger once more:
┌──(walter㉿kali)-[/tmp]
└─$ mitmproxy2swagger -i flows -o spec.yml -p "https://oauth.reddit.com" -f flow --examples
[▌▌▌▌▌▌▌▌▌▌▌▌▌▌▌▌▌▌▌▌▌▌▌▌▌▌▌▌▌▌] 100.0%[warn] flow without response: http://192.168.186.93:8081/flows/dump?filter=oauth.reddit.com/api
Done!
You’ll notice I added the --examples flag at the end. That tells mitmproxy2swagger to add any data from the flow file (like the body of a post request) so I can get an idea of how to re-make the request in the future.
The last step is to convert this spec.yml file into a yaml file. So, head on over to https://editor.swagger.io/ so we can upload our spec.yml file. Select File > Import file to upload your spec.yml. Mine looked like this:
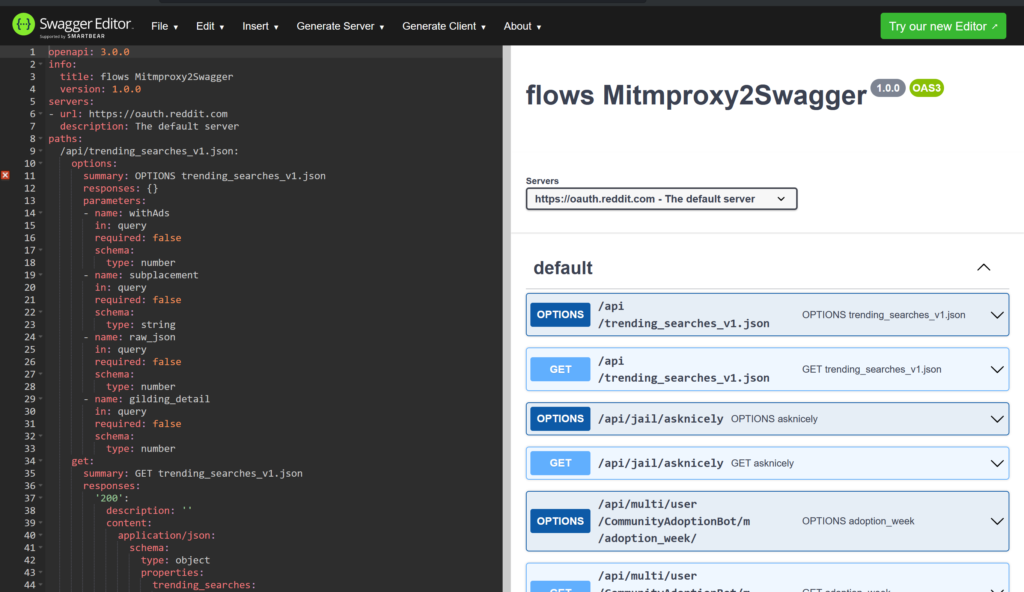
Now click File again and then Save as YAML to export it to yaml.
We did it! The grunt work is over. We can now begin testing our API using other tools.
Enter Postman!
Pun intended…Postman is my favorite tool for the job when testing an API for several reasons. Lets go through part of my initial workflow so you can see why.
First, I open up a fresh workspace. I usually create a separate workspace for each of my bug bounty targets to keep everything organized. Then, it’s as easy as clicking the import button in the top left and importing your YAML file from earlier. Here’s what mine looked like after I imported it:

And Postman auto-magically organizes everything in nested folders for me!
One of the first things I do when testing API’s is see how routes respond without any authentication. The collection runner makes this all a snap! Click on the collection (top most folder), go to the Tests Tab, then select one of the test snippets to get started fast. Then click run!

I like to use the status code 200 to weed out routes that don’t require any authentication, but you can edit the code and customize the cases. Then, it’s time to run the collection by clicking the Run button in the upper right..
This takes you to a new window where you can deselect uninteresting routes. I like to deselect all of the OPT routes so I can focus on the ones that matter.

Then hit run and Postman will automatically run every request.
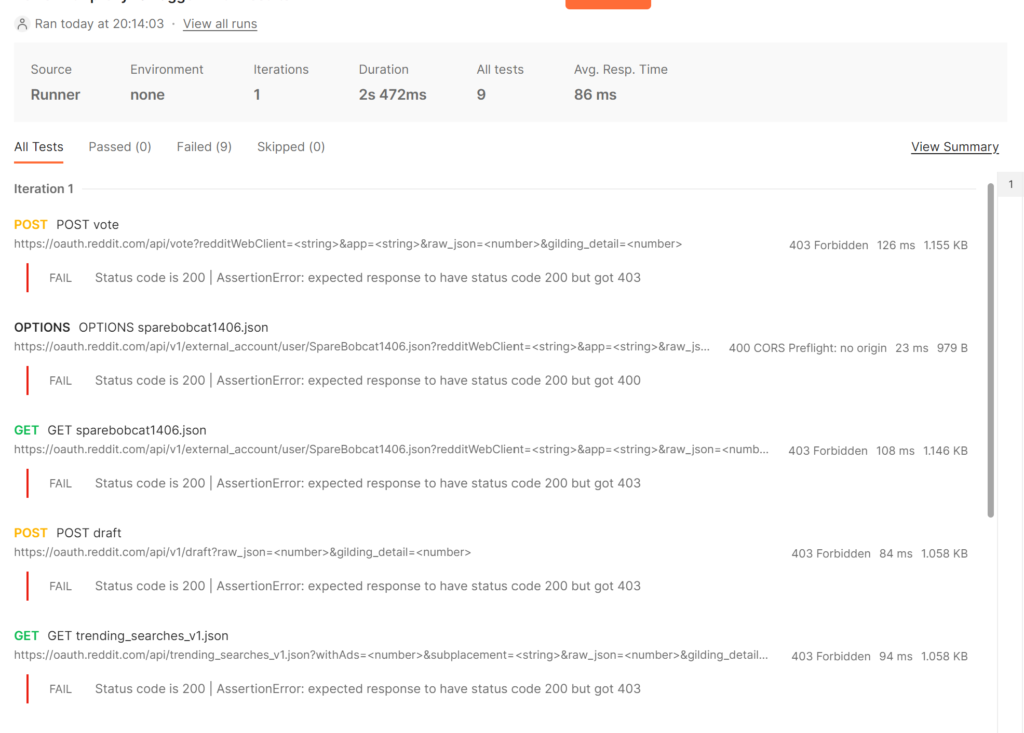
As you can see, all of the 9 routes I collected failed with 403 errors, which was expected since I was authenticated as a user when I proxied this. But, this is a good first step to take when testing an API and Postman makes it so easy!
And there’s so much more it can do! You can create variables, import/export curl commands, write scripts that run before each request, save your Workspace to the cloud to access it from anywhere, proxy requests to other tools (like Burpsuite)…all FOR FREE!
So, I highly encourage you to add this tool to your pentesting toolkit!
Conclusion
Having a click-around, using mitmweb to proxy requests, feeding the results to mitmproxy2swagger and editor.swagger.io, and finally importing the resulting YAML file to Postman is a great way to map API’s.
API’s can be daunting with there complexity. This approach will help you organize the functionality of a web application a lot better.
It’s also worth noting that if API Documentation exists, you should read it to supplement your findings. It’ll be boring but worth it in the end. Good bug hunters are smart bug hunters.
You can also checkout the documentation on the Wayback Machine to see if any old routes are still supported.
Thanks for reading and I hope this makes you a better hacker!
Leave a Reply